
Hướng dẫn dùng cảm biến PIR với ESP32 (Interrupt & Timer millis())
Thứ Sáu,
13/03/2026
Admin

Bài này hướng dẫn cách dùng cảm biến PIR với ESP32 để phát hiện chuyển động bằng Interrupt (ngắt) và Timer (bộ đếm thời gian millis()). Đây là kỹ thuật quan trọng giúp ESP32 phản ứng ngay lập tức với sự kiện mà không cần polling liên tục.
Cảm biến PIR là gì?


PIR (Passive Infrared) là cảm biến phát hiện chuyển động dựa trên tia hồng ngoại bức xạ từ cơ thể người và vật thể. Khi có vật thể di chuyển trong vùng phát hiện, cảm biến xuất ra tín hiệu HIGH.

- 📦 HC-SR501: phổ biến, có thể chỉnh độ nhạy và delay
- 📦 AM312: nhỏ gọn hơn, điện áp 2.7–12V
- Chân OUTPUT: HIGH khi phát hiện chuyển động, LOW khi không có
Interrupt (Ngắt) là gì?

Interrupt cho phép ESP32 dừng ngay chương trình đang chạy và nhảy tới hàm xử lý sự kiện (ISR) khi có tín hiệu thay đổi trên GPIO — không cần liên tục kiểm tra trạng thái trong loop().

ESP32 hỗ trợ interrupt trên tất cả GPIO. Cú pháp:
attachInterrupt(digitalPinToInterrupt(GPIO), ISR_function, MODE);Các MODE phổ biến:
RISING: kích hoạt khi tín hiệu từ LOW → HIGHFALLING: kích hoạt khi tín hiệu từ HIGH → LOWCHANGE: kích hoạt mỗi khi tín hiệu thay đổi
millis() thay thế delay()

Hàm delay() chặn toàn bộ chương trình — ESP32 không làm gì được trong thời gian delay. Thay vào đó dùng millis() để tạo timer không chặn:
unsigned long previousMillis = 0;
const long interval = 1000;
void loop() {
unsigned long currentMillis = millis();
if (currentMillis - previousMillis >= interval) {
previousMillis = currentMillis;
// làm gì đó mỗi 1 giây, không chặn loop
}
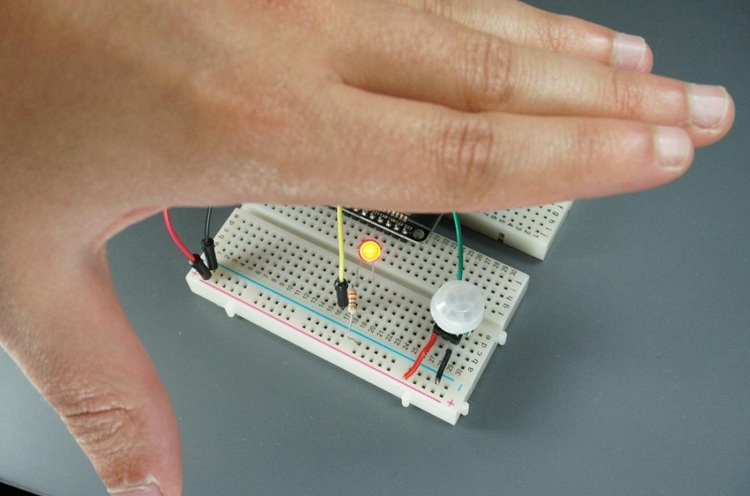
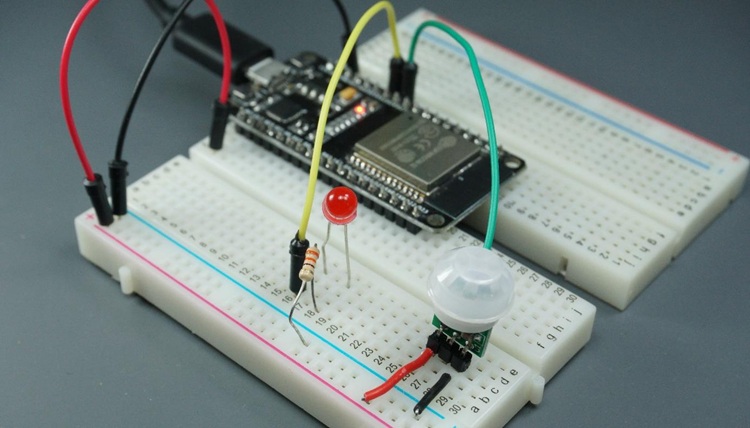
}Sơ đồ kết nối ESP32 + PIR

| PIR | ESP32 |
|---|---|
| VCC | 3.3V hoặc 5V (tùy module) |
| GND | GND |
| OUT | GPIO 27 |
Code – ESP32 PIR phát hiện chuyển động (chỉ detect)
/*********
  Rui Santos
  Complete project details at https://randomnerdtutorials.com
*********/

// constants won't change. Used here to set a pin number :
const int ledPin =  26;      // the number of the LED pin

// Variables will change :
int ledState = LOW;             // ledState used to set the LED

// Generally, you should use "unsigned long" for variables that hold time
// The value will quickly become too large for an int to store
unsigned long previousMillis = 0;        // will store last time LED was updated

// constants won't change :
const long interval = 1000;           // interval at which to blink (milliseconds)

void setup() {
  // set the digital pin as output:
  pinMode(ledPin, OUTPUT);
}

void loop() {
  // here is where you'd put code that needs to be running all the time.

  // check to see if it's time to blink the LED; that is, if the
  // difference between the current time and last time you blinked
  // the LED is bigger than the interval at which you want to
  // blink the LED.
  unsigned long currentMillis = millis();

  if (currentMillis - previousMillis >= interval) {
    // save the last time you blinked the LED
    previousMillis = currentMillis;

    // if the LED is off turn it on and vice-versa:
    if (ledState == LOW) {
      ledState = HIGH;
    } else {
      ledState = LOW;
    }

    // set the LED with the ledState of the variable:
    digitalWrite(ledPin, ledState);
  }
}
Code – ESP32 PIR + LED (bật đèn khi có chuyển động)

Code dưới đây dùng interrupt để phát hiện chuyển động và millis() để bật LED trong một khoảng thời gian định trước mà không block loop():
/*********
  Rui Santos & Sara Santos - Random Nerd Tutorials
  Complete project details at https://RandomNerdTutorials.com/esp32-pir-motion-sensor-interrupts-timers/
  ESP32 GPIO Interrupts with Arduino IDE: https://RandomNerdTutorials.com/esp32-gpio-interrupts-arduino/
*********/
#include <Arduino.h>

// Set GPIOs for LED and PIR Motion Sensor
const uint8_t led = 26;
const uint8_t motionSensor = 27;

// Timer: Auxiliary variables
unsigned long now;
volatile unsigned long lastTrigger = 0;
volatile bool startTimer = false;

bool printMotion = false;

const unsigned long timeSeconds = 20 * 1000UL;  //20 seconds in milliseconds

void ARDUINO_ISR_ATTR motionISR() {
  lastTrigger = millis();
  startTimer = true;
}

void setup() {
  Serial.begin(115200);
  pinMode(motionSensor, INPUT_PULLUP);
  attachInterrupt(motionSensor, motionISR, RISING);

  // Set LED to LOW
  pinMode(led, OUTPUT);
  digitalWrite(led, LOW);
}

void loop() {
  now = millis();

// Turn LED on immediately on new trigger
  if (startTimer && !printMotion) {
    digitalWrite(led, HIGH);
    Serial.println("MOTION DETECTED!!!");
    printMotion = true;
  }

// Turn off the LED after timeout
  if (startTimer && (now - lastTrigger > timeSeconds)) {
    Serial.println("Motion stopped...");
    digitalWrite(led, LOW);
    startTimer = false;
    printMotion = false;
  }
}
Cách code hoạt động
attachInterrupt()đăng ký hàm motionISR() chạy ngay khi GPIO 27 lên HIGH (PIR phát hiện chuyển động)- Trong motionISR(): set flag
motionDetected = truevà ghi lại thời điểm phát hiện (millis()) - Trong
loop(): kiểm tra flag → bật LED → dùngmillis()tắt LED sautimeSecondsgiây - Hàm ISR phải khai báo
IRAM_ATTRđể chạy trong RAM (nhanh hơn Flash)
💡 Lưu ý quan trọng: Hàm ISR phải ngắn gọn, không dùng
delay(), không in Serial trực tiếp. Chỉ set flag hoặc biến, xử lý logic chính trong loop().Ứng dụng thực tế
- 💡 Bật đèn tự động khi có người đi qua
- 🔔 Gửi cảnh báo qua Telegram khi phát hiện xâm nhập
- 📸 Kích hoạt camera chụp ảnh khi có chuyển động
- 🏠 Tích hợp vào hệ thống nhà thông minh
📖 Nguồn: Random Nerd Tutorials – ESP32 PIR Motion Sensor with Interrupts and Timers
Tin liên quan

Hướng dẫn điều khiển Servo Motor với ESP32 qua Web Server (Arduino IDE)
Bài hướng dẫn này giúp bạn xây dựng một web server bằng ESP32 để điều khiển góc quay của động cơ servo thông qua thanh trượt...

Hướng dẫn dùng cảm biến PIR với ESP32 (Interrupt & Timer millis())
Bài này hướng dẫn cách dùng cảm biến PIR với ESP32 để phát hiện chuyển động bằng Interrupt (ngắt) và Timer (bộ đếm thời gian millis())....

Hướng dẫn cài đặt VS Code và PlatformIO IDE để lập trình ESP32/ESP8266
Bài viết này hướng dẫn cài đặt và sử dụng VS Code + PlatformIO IDE để lập trình ESP32 và ESP8266 — một môi trường lập...

Hướng dẫn cài đặt ESP32 vào Arduino IDE (Windows, Linux, macOS)
Bài viết này hướng dẫn chi tiết cách cài đặt board ESP32 vào Arduino IDE để bắt đầu lập trình ESP32. Đây là bước đầu tiên bắt buộc trước khi...

Hướng dẫn dùng cảm biến DHT11/DHT22 với ESP32 (Nhiệt độ & Độ ẩm)
Trong bài này, bạn sẽ học cách kết nối cảm biến DHT11 hoặc DHT22 với ESP32 để đọc nhiệt độ và độ ẩm bằng Arduino IDE....
