
Hướng dẫn dùng Load Cell và HX711 với Arduino (Cân điện tử tự làm)
Thứ Sáu,
13/03/2026
Admin

Trong bài này, bạn sẽ học cách kết nối load cell (cảm biến cân nặng) với module khuếch đại HX711 và Arduino để tạo ra một cân điện tử kỹ thuật số. Cảm biến load cell hoạt động theo nguyên lý cầu Wheatstone, đo sự thay đổi điện trở khi bị biến dạng dưới tác dụng lực.
Load Cell là gì?


Load cell là cảm biến chuyển đổi lực hoặc trọng lượng thành tín hiệu điện. Bên trong là các strain gauge (điện trở biến dạng) được bố trí theo cầu Wheatstone. Khi có lực tác dụng, điện trở thay đổi → điện áp đầu ra thay đổi → đo được trọng lượng.
Load cell thường có 4 dây:
- 🔴 Đỏ (E+): nguồn dương kích thích
- ⚫ Đen (E-): nguồn âm kích thích
- 🟢 Xanh lá (A-): tín hiệu âm
- ⬜ Trắng (A+): tín hiệu dương
Module khuếch đại HX711


HX711 là IC khuếch đại ADC 24-bit chuyên dùng cho load cell. Giao tiếp với Arduino chỉ cần 2 chân digital (DT và SCK), không cần I2C hay SPI phức tạp.
Sơ đồ kết nối
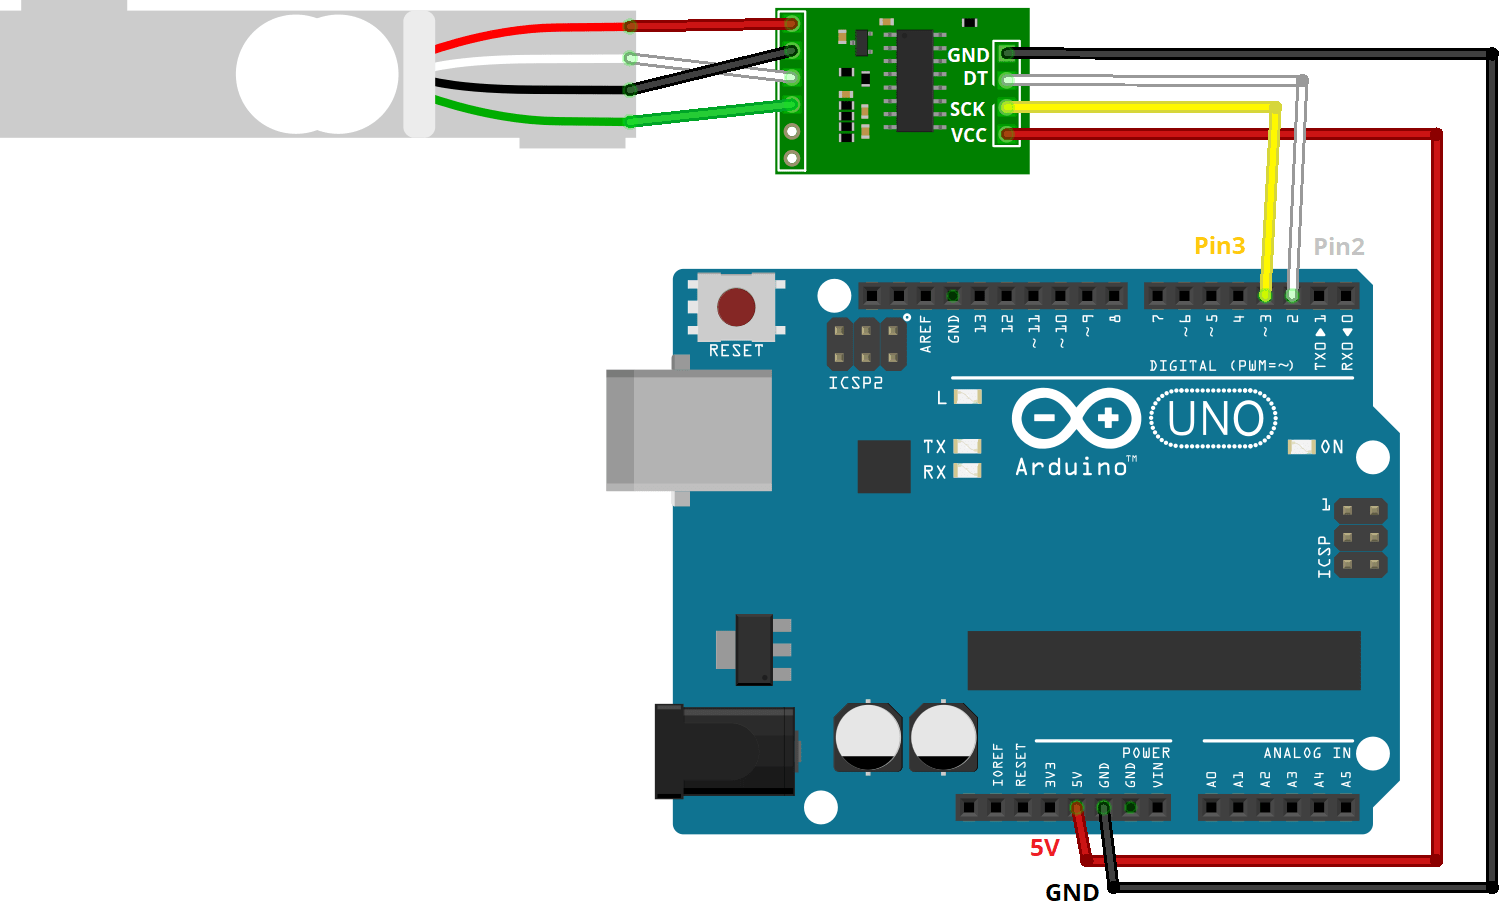
| HX711 | Arduino |
|---|---|
| VCC | 5V |
| GND | GND |
| DT (Data) | GPIO 3 |
| SCK (Clock) | GPIO 2 |
Kết nối load cell với HX711: dây đỏ → E+, đen → E-, xanh lá → A-, trắng → A+.
Cài thư viện HX711

Mở Arduino IDE → Sketch → Include Library → Manage Libraries → tìm "HX711 Arduino Library" by Bogdan Necula → Install.
Bước 1 – Hiệu chỉnh cân (Calibration)

Trước khi đo, cần hiệu chỉnh để xác định calibration factor. Nạp code calibration dưới đây, mở Serial Monitor, làm theo hướng dẫn: đặt vật có khối lượng biết trước lên cân và điều chỉnh giá trị cho đến khi đúng.
/*
  Rui Santos
  Complete project details at https://RandomNerdTutorials.com/arduino-load-cell-hx711/

  Permission is hereby granted, free of charge, to any person obtaining a copy
  of this software and associated documentation files.

  The above copyright notice and this permission notice shall be included in all
  copies or substantial portions of the Software.
*/

// Calibrating the load cell
#include "HX711.h"

// HX711 circuit wiring
const int LOADCELL_DOUT_PIN = 2;
const int LOADCELL_SCK_PIN = 3;

HX711 scale;

void setup() {
  Serial.begin(57600);
  scale.begin(LOADCELL_DOUT_PIN, LOADCELL_SCK_PIN);
}

void loop() {

  if (scale.is_ready()) {
    scale.set_scale();
    Serial.println("Tare... remove any weights from the scale.");
    delay(5000);
    scale.tare();
    Serial.println("Tare done...");
    Serial.print("Place a known weight on the scale...");
    delay(5000);
    long reading = scale.get_units(10);
    Serial.print("Result: ");
    Serial.println(reading);
  }
  else {
    Serial.println("HX711 not found.");
  }
  delay(1000);
}

//calibration factor will be the (reading)/(known weight)
Bước 2 – Đọc trọng lượng

Sau khi có calibration factor, thay vào code chính để đọc trọng lượng liên tục:
/**
 * Complete project details at https://RandomNerdTutorials.com/arduino-load-cell-hx711/
 *
 * HX711 library for Arduino - example file
 * https://github.com/bogde/HX711
 *
 * MIT License
 * (c) 2018 Bogdan Necula
 *
**/

#include <Arduino.h>
#include "HX711.h"

// HX711 circuit wiring
const int LOADCELL_DOUT_PIN = 2;
const int LOADCELL_SCK_PIN = 3;

HX711 scale;

void setup() {
  Serial.begin(57600);
  Serial.println("HX711 Demo");
  Serial.println("Initializing the scale");

  scale.begin(LOADCELL_DOUT_PIN, LOADCELL_SCK_PIN);

  Serial.println("Before setting up the scale:");
  Serial.print("read: \t\t");
  Serial.println(scale.read());      // print a raw reading from the ADC

  Serial.print("read average: \t\t");
  Serial.println(scale.read_average(20));   // print the average of 20 readings from the ADC

  Serial.print("get value: \t\t");
  Serial.println(scale.get_value(5));   // print the average of 5 readings from the ADC minus the tare weight (not set yet)

  Serial.print("get units: \t\t");
  Serial.println(scale.get_units(5), 1);  // print the average of 5 readings from the ADC minus tare weight (not set) divided
            // by the SCALE parameter (not set yet)

  scale.set_scale(-459.542);
  //scale.set_scale(-471.497);                      // this value is obtained by calibrating the scale with known weights; see the README for details
  scale.tare();               // reset the scale to 0

  Serial.println("After setting up the scale:");

  Serial.print("read: \t\t");
  Serial.println(scale.read());                 // print a raw reading from the ADC

  Serial.print("read average: \t\t");
  Serial.println(scale.read_average(20));       // print the average of 20 readings from the ADC

  Serial.print("get value: \t\t");
  Serial.println(scale.get_value(5));   // print the average of 5 readings from the ADC minus the tare weight, set with tare()

  Serial.print("get units: \t\t");
  Serial.println(scale.get_units(5), 1);        // print the average of 5 readings from the ADC minus tare weight, divided
            // by the SCALE parameter set with set_scale

  Serial.println("Readings:");
}

void loop() {
  Serial.print("one reading:\t");
  Serial.print(scale.get_units(), 1);
  Serial.print("\t| average:\t");
  Serial.println(scale.get_units(10), 5);

  delay(5000);
}
Cân điện tử với màn hình OLED


Nâng cấp thêm màn hình OLED SSD1306 và nút nhấn tare để reset về 0 — giống cân điện tử thực tế. Linh kiện bổ sung:
- Màn hình OLED 0.96" I2C (SSD1306)
- 1 nút nhấn
- Điện trở 10kΩ
Serial.println("Before setting up the scale:");
Serial.print("read: \t\t");
Serial.println(scale.read());      // print a raw reading from the ADC

Serial.print("read average: \t\t");
Serial.println(scale.read_average(20));   // print the average of 20 readings from the ADC

Serial.print("get value: \t\t");
Serial.println(scale.get_value(5));   // print the average of 5 readings from the ADC minus the tare weight (not set yet)

Serial.print("get units: \t\t");
Serial.println(scale.get_units(5), 1);  // print the average of 5 readings from the ADC minus tare weight (not set) divided
// by the SCALE parameter (not set yet)
Kết quả thực tế

Sau khi hoàn thành, bạn có một chiếc cân điện tử tự làm có thể đo từ vài gram đến vài kg (tùy load cell). Ứng dụng thực tế: cân nguyên liệu nấu ăn, cân bưu phẩm, đo trọng lượng trong các dự án tự động hóa.
📖 Nguồn: Random Nerd Tutorials – Arduino with Load Cell and HX711 Amplifier
Tin liên quan

Hướng dẫn điều khiển Servo Motor với ESP32 qua Web Server (Arduino IDE)
Bài hướng dẫn này giúp bạn xây dựng một web server bằng ESP32 để điều khiển góc quay của động cơ servo thông qua thanh trượt...

Hướng dẫn dùng cảm biến PIR với ESP32 (Interrupt & Timer millis())
Bài này hướng dẫn cách dùng cảm biến PIR với ESP32 để phát hiện chuyển động bằng Interrupt (ngắt) và Timer (bộ đếm thời gian millis())....

Hướng dẫn cài đặt VS Code và PlatformIO IDE để lập trình ESP32/ESP8266
Bài viết này hướng dẫn cài đặt và sử dụng VS Code + PlatformIO IDE để lập trình ESP32 và ESP8266 — một môi trường lập...

Hướng dẫn cài đặt ESP32 vào Arduino IDE (Windows, Linux, macOS)
Bài viết này hướng dẫn chi tiết cách cài đặt board ESP32 vào Arduino IDE để bắt đầu lập trình ESP32. Đây là bước đầu tiên bắt buộc trước khi...

Hướng dẫn dùng cảm biến DHT11/DHT22 với ESP32 (Nhiệt độ & Độ ẩm)
Trong bài này, bạn sẽ học cách kết nối cảm biến DHT11 hoặc DHT22 với ESP32 để đọc nhiệt độ và độ ẩm bằng Arduino IDE....
